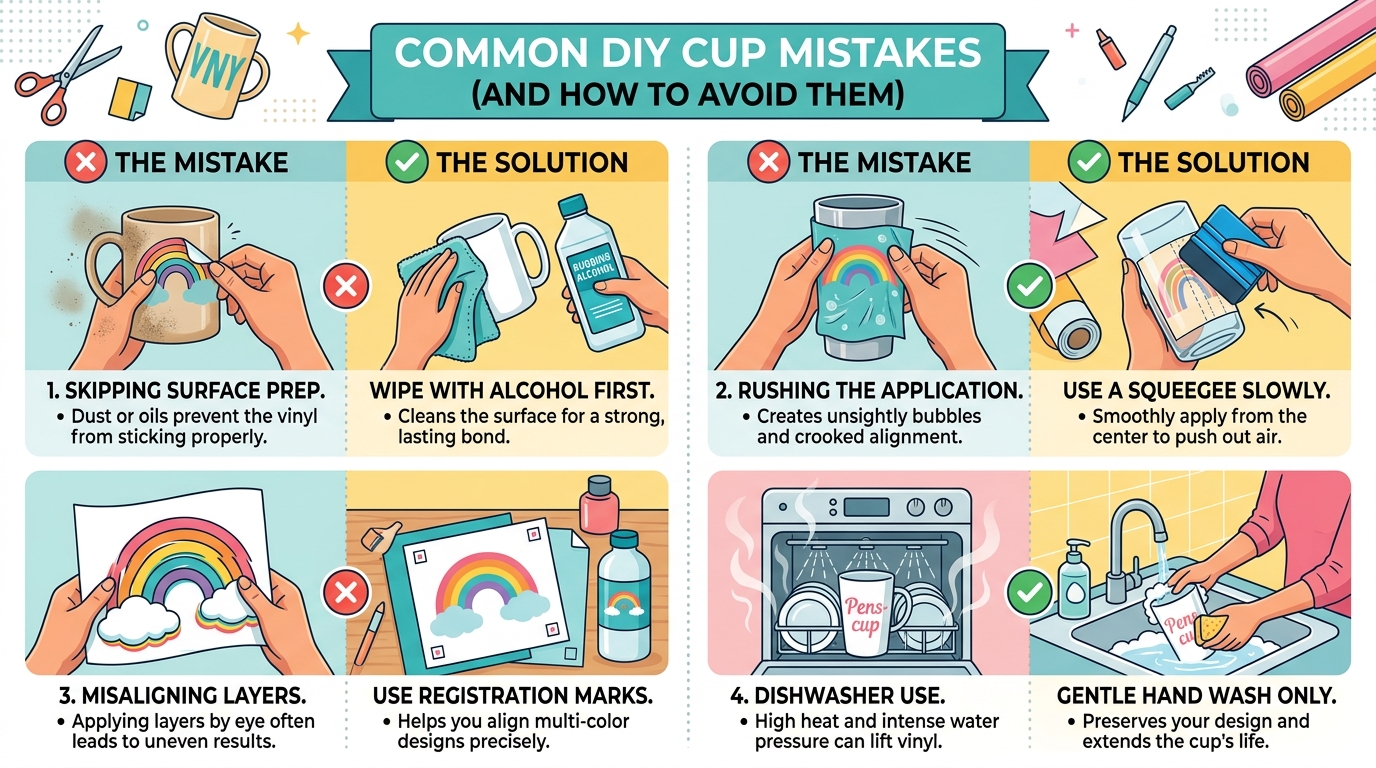
One of the most common mistakes in DIY cup crafting is not preparing the surface properly before starting the design. Many people directly begin painting or decorating without cleaning the cup. However, cups often have dust, oil, or fingerprints on the surface that prevent paint or adhesive from sticking correctly. When the surface is not properly cleaned, the design may peel off, fade quickly, or appear uneven. To avoid this issue, it is important to wash the cup thoroughly with mild soap and water, dry it completely, and then wipe it with rubbing alcohol to remove any hidden grease or residue. Only when the surface is completely clean and dry should you begin your design work.
Using the Wrong Type of Paint or Materials
Another major mistake is using the wrong type of paint or materials for cup decoration. Regular craft paints are not suitable for cups because they are not designed to handle water, heat, or frequent washing. As a result, the design may wash away or crack after a few uses. To avoid this problem, it is important to use ceramic or glass-specific paints that are waterproof and heat-resistant. This ensures that your design stays intact even after multiple washes and regular use. Choosing the right material is one of the most important steps in achieving a durable DIY cup.
Applying Paint Too Thickly or Unevenly
Applying paint too thickly or unevenly is another common issue faced by beginners. Many people believe that a thick layer of paint provides better coverage, but in reality, it often leads to cracking, uneven texture, and poor finishing. Thick layers also take longer to dry, increasing the risk of smudging or damage. The correct approach is to apply thin and even layers of paint, allowing each layer to dry completely before applying the next one. This method ensures a smooth, professional-looking finish that enhances the overall appearance of the cup.
Ignoring Proper Drying Time
Drying time is another crucial factor that is often ignored. Many beginners rush the process and handle the cup before the paint is fully dry. This can result in smudges, fingerprints, or completely damaged designs. Proper drying time allows the paint to settle and bond correctly with the surface. It is important to place the cup in a dust-free environment and avoid touching it until it is completely dry. Following the recommended drying time provided by the paint manufacturer also helps in achieving better durability and finish.
Not Sealing the Design Properly
Failing to seal the design properly is another serious mistake. Even if the painting is done perfectly, it can still fade or wash away over time if not sealed correctly. A protective sealant or varnish helps protect the design from moisture, scratches, and daily wear and tear. Without sealing, the artwork becomes vulnerable and loses its quality quickly. Applying a clear protective coat ensures that your DIY cup remains fresh and long-lasting.
Overheating or Improper Curing
Improper curing or overheating is also a problem when working with heat-set designs. Some DIY cups require baking in an oven to set the paint. If the temperature is too high or uneven, the cup may crack or the paint may burn. It is important to follow the correct temperature instructions carefully and allow the cup to cool naturally after heating. Sudden temperature changes should always be avoided to prevent damage.
Using Low-Quality Brushes and Tools
Using low-quality brushes and tools is another mistake that affects the final result. Poor brushes can leave streaks, uneven paint marks, or even shed hairs onto the design. This reduces the overall quality and precision of the artwork. High-quality brushes provide better control, smoother application, and cleaner designs. Taking care of tools and cleaning them properly after each use also improves performance and longevity.
Rushing the Creative Process
Rushing the entire creative process is a mistake that many beginners make. DIY cup crafting requires patience and attention at every step. When the process is rushed, the chances of errors increase significantly, resulting in poor finishing and lower quality designs. Taking time to plan the design, apply paint carefully, and allow proper drying ensures much better results.
Not Testing Materials Before Final Use
Another mistake is not testing materials before using them on the final cup. Paint colors and materials may behave differently on different surfaces, and without testing, the final result may not match expectations. Testing on a small surface or spare cup helps avoid unwanted surprises and ensures better control over the final outcome.
Improper Cleaning After Completion
Finally, improper cleaning after completing the design can also reduce the lifespan of a DIY cup. Harsh washing methods, strong detergents, or scrubbing can damage the design and remove protective layers. Gentle hand washing with a soft sponge is always recommended to preserve the artwork for a longer time.
Conclusion
DIY cup crafting is a creative and enjoyable activity, but it requires proper care, patience, and correct technique. Most mistakes happen due to lack of preparation, wrong materials, or rushing the process. By avoiding these common errors and following proper steps, you can create high-quality, durable, and visually appealing DIY cups. With practice and attention to detail, anyone can improve their skills and turn simple cup decoration into a professional-level craft.